
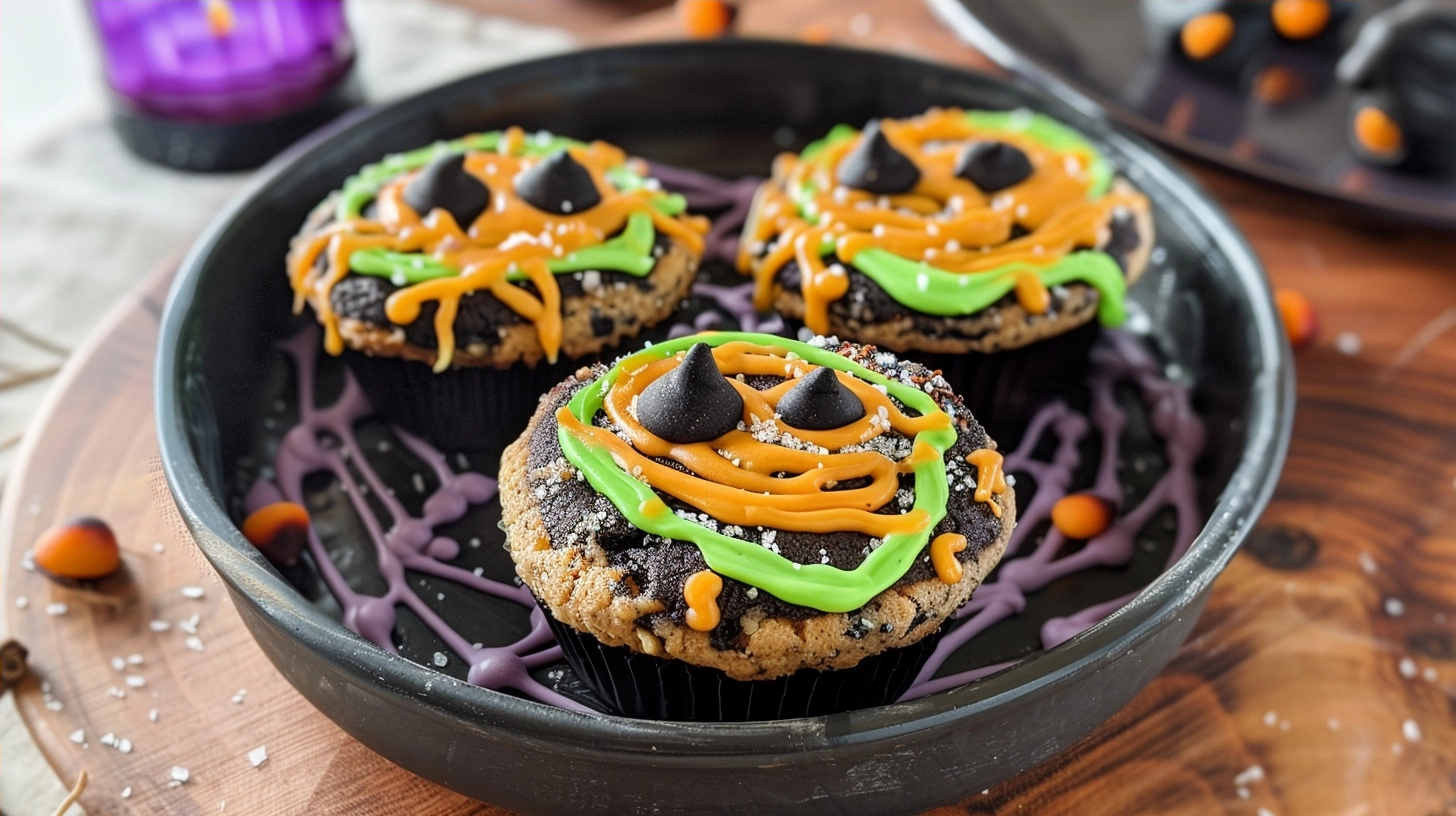
The Halloween Cauldron Cookie is a festive chocolate shortbread base shaped into a bubbling pot and topped with vibrant green candy. These delightful treats offer a perfect blend of rich cocoa flavors and fun, spooky presentation for any autumn celebration. Each cookie provides a buttery crunch that holds up beautifully to decorative icing and candy additions.
Why You’ll Love This Halloween Cauldron Cookie
These cookies strike a balance between deep, dark chocolate flavor and sweet, playful decorations. The dough is sturdy enough to hold its shape during baking, ensuring that your cauldron designs remain crisp and recognizable every time you pull a tray from the oven.
You will appreciate how simple it is to transform basic pantry staples into impressive holiday showstoppers. The process requires no complicated piping skills, making it an ideal activity for bakers of all experience levels who want to add a touch of magic to their dessert spread.
The texture is the true highlight, featuring a melt-in-your-mouth crumb that pairs perfectly with a warm glass of milk. Whether you are hosting a party or just looking for a cozy weekend baking project, these cookies provide consistent, crowd-pleasing results that vanish from the platter in minutes.
Ingredients of the Halloween Cauldron Cookie
For the Chocolate Base
- 2 cups all-purpose flour
- 1/2 cup unsweetened cocoa powder
- 1/2 cup unsalted butter, softened
- 3/4 cup granulated sugar
- 1 large egg
- 1/2 teaspoon baking powder
- 1/4 teaspoon salt
For the Decoration
- 1 cup green candy melts
- 1/4 cup dark chocolate chips
- Edible sugar eyes
- Miniature colored candy sprinkles
Equipment / Tools Needed
- Large mixing bowl
- Electric hand mixer
- Cauldron-shaped cookie cutter
- Baking sheet
- Parchment paper
- Wire cooling rack
- Small piping bag or plastic sandwich bag
Step-by-Step Instructions
Step 1: Cream the Butter and Sugar
In your large mixing bowl, beat the softened butter and granulated sugar together on medium speed until the mixture is pale, light, and fluffy. This aeration process is essential for creating a light cookie texture, so take about three minutes to ensure the sugar is fully incorporated into the fats.
Step 2: Incorporate the Wet Ingredients
Add the egg to the butter mixture, beating well until fully combined. Ensure you scrape down the sides of the bowl with a spatula to maintain a uniform consistency, which prevents any eggy streaks from disrupting the dough structure.
Step 3: Mix the Dry Ingredients
Sift the flour, cocoa powder, baking powder, and salt directly into the wet ingredients. Mix on low speed until a thick, dark brown dough begins to form. Once the flour is mostly incorporated, finish by hand to avoid overworking the dough, which keeps the cookies tender rather than tough.
Step 4: Roll and Cut the Shapes
Wrap the dough in plastic and chill for thirty minutes to make it easier to handle. Roll the dough out on a lightly floured surface to a quarter-inch thickness. Use your cauldron-shaped cutter to punch out the shapes, placing them carefully onto a parchment-lined baking sheet.
Step 5: Bake and Cool
Bake at 350 degrees Fahrenheit for 10 to 12 minutes until the edges are firm. The chocolate aroma should fill the kitchen, signaling they are ready to come out. Let them sit on the tray for five minutes before transferring to a wire cooling rack to reach room temperature.
Step 6: Decorate the Cauldrons
Melt your green candy chips in the microwave in 30-second intervals until smooth. Spoon or pipe the green mixture onto the top of each cookie to represent the bubbling potion. Quickly add the edible eyes and sprinkles while the coating is still wet so they set firmly in place.
Tips & Tricks
For the cleanest cuts, keep the dough chilled between batches; warm dough tends to lose its shape. Always use high-quality cocoa powder to ensure the deepest, most chocolatey flavor profile. If your piping bag is unavailable, a small plastic bag with a tiny corner snipped off works perfectly for controlled, mess-free decorating.
Serving Suggestions
These cookies look incredible arranged on a wooden platter alongside dark, rustic decorations. They pair exceptionally well with spiced apple cider or a warm mug of cocoa. Serving them at room temperature is best, as it allows the cookie texture to remain crisp while the candy topping provides a pleasant snap.
Variations / Substitutions
- Replace the green candy melts with purple or orange for a different color theme.
- Substitute the cocoa powder with a gluten-free flour blend if you need to accommodate specific dietary preferences.
- Add a dash of peppermint extract to the dough for a fresh, festive flavor twist.
Storage and Reheating
Store your finished cookies in an airtight container at room temperature for up to five days. Avoid placing them in the refrigerator, as the moisture can soften the cookies and ruin the texture of the candy decorations. Do not reheat these; they are designed to be enjoyed at room temperature.
Nutritional Info
Calories: 180 kcal
Protein: 2g
Carbohydrates: 24g
Fat: 9g
Conclusion
The Halloween Cauldron Cookie brings a festive, imaginative flair to your holiday baking without requiring expert skills. The rich chocolate base combined with the whimsical bubbling potion topping ensures these treats are as fun to make as they are to eat.
Happy baking and enjoy the creative process of bringing these spooky little pots to life for your friends and family. Your kitchen will smell heavenly, and your dessert table will have the perfect conversation starter.
FAQ
Can I make the dough in advance?
Yes, you can prepare the dough up to three days in advance and keep it wrapped tightly in the refrigerator. Just let it sit on the counter for ten minutes before rolling it out so it becomes pliable enough to cut without cracking.
What if I do not have a cauldron-shaped cutter?
You can easily use a circle or square cutter and draw a simple cauldron design on top using the melted candy. The shape doesn’t have to be perfect to achieve the desired spooky effect.
Can these cookies be frozen?
You can freeze the unbaked cookie cut-outs for up to one month. Simply bake them directly from the freezer, adding an extra two minutes to the total baking time, and decorate once they have cooled completely.
How do I prevent the candy topping from hardening too fast?
Work with one small batch of cookies at a time when decorating. If your green candy starts to thicken, place the bowl back into the microwave for 10 seconds to restore its smooth, liquid consistency.
Halloween Cauldron Cookie Treats
Ingredients
- 2 cups all-purpose flour
- 1/2 cup unsweetened cocoa powder
- 1/2 cup unsalted butter, softened
- 3/4 cup granulated sugar
- 1 large egg
- 1/2 teaspoon baking powder
- 1/4 teaspoon salt
- 1 cup green candy melts
- 1/4 cup dark chocolate chips
- Edible sugar eyes
- Miniature colored candy sprinkles
Instructions
- In a large mixing bowl, beat the softened butter and sugar on medium speed for 3 minutes until pale and fluffy.
- Add the egg to the mixture and beat until well combined, scraping down the sides of the bowl as needed.
- Sift the flour, cocoa powder, baking powder, and salt together, then add to the wet ingredients on low speed until a dough forms.
- Roll out the dough on a lightly floured surface and use a cauldron-shaped cookie cutter to cut out shapes.
- Place cookies on a parchment-lined baking sheet and bake at 350°F for 10-12 minutes.
- Allow cookies to cool completely on a wire rack.
- Melt the green candy melts and drizzle over the top of the cooled cookies to resemble bubbling potion.
- Add dark chocolate chips, edible eyes, and sprinkles while the green candy is still soft.