

Are you ready to embark on a delightful culinary adventure? Making macaro from scratch is not only a rewarding experience but also a chance to indulge in homemade desserts that are both beautiful and delicious. These delicate, colorful treats are perfect for any occasion, and they offer endless possibilities for customization. Whether you prefer classic flavors or want to experiment with something unique, this guide will help you create gourmet treats that impress. Additionally, crafting macarons at home allows you to develop your baking skills while catering to dietary preferences, such as gluten-free options. So, let’s dive into the world of macaro and discover how to make these exquisite delights!
Table of Contents
Table of Contents

macaro
Equipment
- 1 Mixing Bowl For whipping egg whites.
- 1 Electric Mixer To whip the meringue.
- 1 Sifter For sifting almond flour and powdered sugar.
- 1 Piping Bag For piping the macaro batter.
- 2 Baking Sheets For baking the macaro.
- 1 Parchment paper To line the baking sheets.
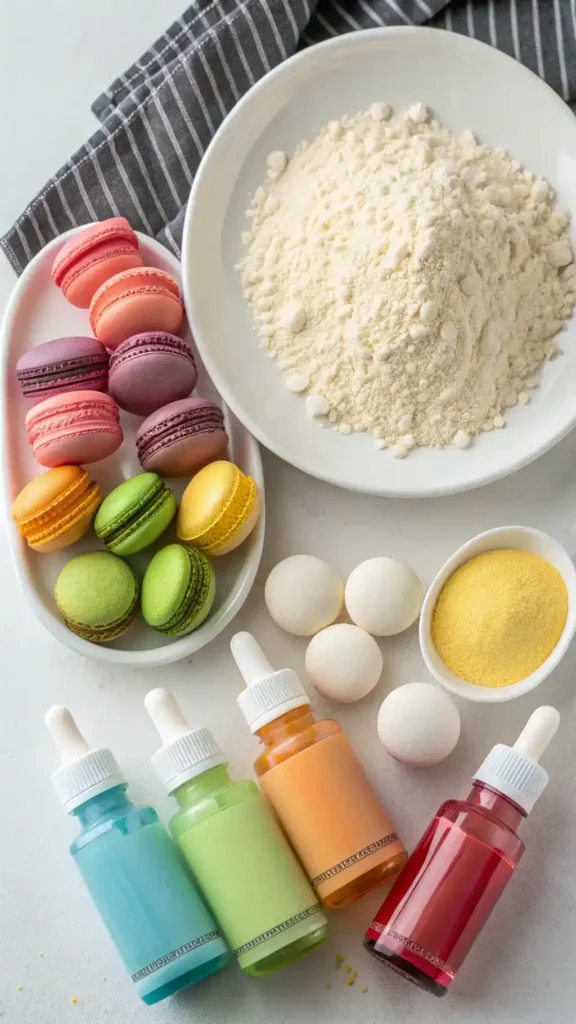
Ingredients
Dry Ingredients
- 1 cup Almond Flour Finely ground for best results.
- 1 ¾ cups Powdered Sugar Sifted with almond flour.
Wet Ingredients
- 3 large Egg Whites Fresh for best meringue.
- ¼ teaspoon Cream of Tartar Helps stabilize the meringue.
- ½ cup Granulated Sugar Added to meringue.
Coloring and Fillings
- as needed drops Food Coloring For coloring the macaro.
- as desired amount Fillings Choose from buttercream or ganache.
Instructions
Preparation
- Start by gathering all your ingredients. You will need almond flour, powdered sugar, egg whites, cream of tartar, and granulated sugar. Consider food coloring and your choice of fillings.
Meringue
- In a clean mixing bowl, whip the egg whites using an electric mixer. Add cream of tartar and gradually add granulated sugar until stiff peaks form.
Sifting
- Sift together almond flour and powdered sugar. If desired, add food coloring to the meringue.
Folding
- Gently fold the dry ingredients into the meringue until the mixture flows like lava.
Piping
- Line baking sheets with parchment paper and pipe small circles of batter. Tap the sheets to release air bubbles.
Resting
- Allow the piped macaro to rest at room temperature for 30-60 minutes until dry to the touch.
Baking
- Preheat oven to 300°F (150°C) and bake for 15-20 minutes. Allow to cool completely on the baking sheets.
Assembling
- Pair similar-sized macaro shells, pipe filling onto one shell, and sandwich with another shell.
Storing
- Let the assembled macaro sit in the refrigerator for at least 24 hours before serving.
Notes
Key Benefits
Making macarons at home is not just a delightful culinary adventure; it also comes with several key benefits that make the experience truly rewarding. Here are the top reasons to whip up these gourmet treats:
- Customizable Flavors: One of the best parts about making macaro is that you can tailor the flavors to your liking. Whether you prefer classic vanilla, zesty lemon, or even exotic matcha, the possibilities are endless!
- Gourmet Treats at Home: Crafting macarons from scratch allows you to enjoy gourmet desserts without the hefty price tag. Impress your friends and family with your baking skills while enjoying these elegant treats.
- Skill Development: Baking macaro is a fantastic way to enhance your culinary skills. As you practice, you’ll learn valuable techniques that can be applied to other recipes, boosting your confidence in the kitchen.
- Gluten-Free Options: If you or someone you know has dietary restrictions, macarons can easily be made gluten-free. Using almond flour as the base, these treats can cater to various dietary needs without sacrificing flavor.
- Homemade Desserts: There’s something special about homemade desserts. Not only do they taste better, but they also allow you to control the ingredients, ensuring a fresher and healthier option for you and your loved ones.
In summary, making macarons is not only a fun and creative process but also a way to enjoy delicious, customized desserts that cater to your preferences and dietary needs. So, gather your ingredients and start your macaroon-making journey today!
Ingredients
To create delightful macarons, you’ll need a handful of essential ingredients that come together to create magic. Here’s what you’ll need:
- Almond Flour: This is the star of the show! It gives macarons their signature nutty flavour and delicate texture. Make sure it’s finely ground for the best results.
- Egg Whites: Fresh egg whites are crucial for achieving that perfect meringue. They whip up beautifully, creating the light and airy structure that makes macarons so irresistible.
- Granulated Sugar: Sweetness is key! This sugar helps stabilize the meringue and adds that delightful sweetness we all love.
- Cream of Tartar: Just a pinch of this magical powder helps to stabilize the egg whites, ensuring your meringue holds its shape. It’s like a little insurance policy for your macarons!
- Food Coloring: Want to add a pop of color? Food coloring is your best friend here! Whether you prefer pastel shades or vibrant hues, it’s a fun way to personalize your macarons.
- Fillings: The possibilities are endless! From rich buttercream to luscious ganache, choose your favorite fillings to create a flavor explosion in every bite.
Now that you have your ingredients lined up, you’re one step closer to making delicious macarons! Remember, the beauty of macarons lies not only in their taste but also in their vibrant colours and creative fillings. So, gather your supplies, and let’s get baking!
How to Make Macarons
Making macarons from scratch is a delightful journey that combines precision and creativity. Follow this step-by-step guide to craft these exquisite treats, ensuring you enjoy the process as much as the end result.
- Prepare Your Ingredients: Start by gathering all your ingredients. You will need 1 cup of almond flour, 1 ¾ cups of powdered sugar, 3 large egg whites, ¼ teaspoon of cream of tartar, and ½ cup of granulated sugar. Additionally, consider food coloring and your choice of fillings, such as buttercream or ganache. Having everything ready will streamline your baking process.
- Make the Meringue: In a clean mixing bowl, whip the egg whites using an electric mixer. Begin at a low speed and gradually increase to medium-high. Once the egg whites become frothy, add the cream of tartar. This step is crucial, as it stabilizes the meringue. Continue beating until soft peaks form, then slowly add the granulated sugar. Beat until stiff peaks develop, which should take about 5-7 minutes. The meringue should be glossy and hold its shape.
- Sift the Dry Ingredients: In a separate bowl, sift together the almond flour and powdered sugar. This process not only combines the ingredients but also aerates them, ensuring a light texture in your macarons. If you desire colored macaro, add a few drops of food coloring to the meringue at this stage, mixing gently to achieve an even color.
- Fold the Mixtures: Gently fold the dry ingredients into the meringue using a spatula. It’s important to use a technique that maintains the airiness of the meringue. Use a figure-eight motion, scraping the sides of the bowl. Continue folding until the mixture flows like lava; this indicates it’s ready for piping.
- Pipe the Macaro: Line two baking sheets with parchment paper. Transfer the macaro batter into a piping bag fitted with a round tip. Pipe small circles, about 1.5 inches in diameter, leaving space between each one. Tap the baking sheets gently on the counter to release any air bubbles. This step is essential for achieving that signature macaroon “foot.”
- Rest the Macaro: Allow the piped macaro to rest at room temperature for 30-60 minutes. This drying time is crucial, as it forms a skin on the surface, preventing cracks during baking. You’ll know they’re ready when they feel dry to the touch.
- Bake the Macaro: Preheat your oven to 300°F (150°C). Bake the macarons for 15-20 minutes, rotating the trays halfway through. Keep an eye on them; they should not brown. Once done, they should easily lift off the parchment paper. Allow them to cool completely on the baking sheets.
- Assemble the Macaro: Once cooled, pair similar-sized macaro shells. Pipe your chosen filling onto the flat side of one shell, then gently press another shell on top to create a sandwich. This step allows the flavours to meld beautifully.
- Store and Enjoy: For the best flavour, let the assembled macarons sit in the refrigerator for at least 24 hours before serving. This resting period enhances their taste and texture. When ready to enjoy, serve them chilled or at room temperature.

By following these steps, you’ll create delightful macarons that are not only visually stunning but also delicious. Enjoy the process and share your creations with fellow dessert lovers!
Pro Tips, Variations, and Common Problems
Making macarons can be a delightful adventure, but it’s not without its challenges. Here are some pro tips to help you navigate the process smoothly, along with variations to spark your creativity and solutions for common problems.
Pro Tips
– Measure Accurately: Use a kitchen scale for precise measurements of almond flour and sugar. This ensures consistent results every time.
– Sift Your Ingredients: Sifting almond flour and powdered sugar together helps eliminate lumps. This step is crucial for achieving that smooth macaro shell.
– Age Your Egg Whites: Let your egg whites sit at room temperature for a few hours or overnight. Aging helps them whip up to a better volume, creating a lighter texture.
– Macaronage Technique: When folding the batter, be gentle yet thorough. The mixture should flow like lava but hold its shape. If it’s too thick, your macaro may crack; if too thin, they may spread.
– Rest Before Baking: Allow your piped macaro to rest for 30-60 minutes before baking. This forms a skin on the surface, which helps them rise beautifully and prevents cracking.
Flavor Variations
– Citrus Zest: Add lemon or orange zest to your batter for a refreshing twist. This brightens the flavor and adds a lovely aroma.
– Chocolate Delight: Incorporate cocoa powder into your dry ingredients for chocolate macaro. Pair with chocolate ganache for a decadent filling.
– Herbal Infusions: Consider adding finely chopped herbs like lavender or rosemary for a unique flavor profile. Just be sure to use them sparingly!
– Nutty Alternatives: Swap almond flour for hazelnut or pistachio flour for a different nutty flavor. This can create a delightful variation that’s equally delicious.
Common Problems and Solutions
– Cracked Shells: If your macaro crack, it’s often due to overmixing or not resting long enough. Ensure you’re folding the batter correctly and allow adequate resting time.
– Hollow Centers: This can happen if the batter is too thin or if you underbake them. Make sure to achieve the right consistency and bake until they have a firm base.
– Uneven Feet: If your macaro don’t have those lovely feet, it could be due to improper piping or not resting long enough. Practice your piping technique and be patient with the resting phase.
– Sticky Bottoms: If your macaro stick to the baking mat, they may not have been baked long enough. Ensure they are fully cooked before removing them from the tray.
With these tips and variations, you’ll be well on your way to mastering macaro. Remember, practice makes perfect, so don’t be discouraged by any hiccups along the way. Happy baking!
Serving Suggestions
When it comes to serving macaro, the possibilities are as delightful as the treats themselves. Here are some unique ideas to elevate your presentation and impress your guests:
- Dessert Platters: Arrange your macaro on a beautiful platter, mixing colors and flavors for a stunning visual effect. Consider adding fresh fruits or edible flowers to enhance the aesthetic.
- Tea and Coffee Pairings: Serve your macaro alongside a selection of teas or coffees. The delicate flavors of macaro complement the rich notes of coffee or the subtlety of herbal teas beautifully.
- Gift Boxes: Package your macaro in elegant boxes tied with ribbons. This makes for a charming gift for friends or family, especially during special occasions.
- Layered Desserts: Incorporate macaro into layered desserts. For instance, crumble them between layers of mousse or parfait for an exciting texture contrast.
- Seasonal Themes: Adapt your serving style to the season. For example, during the holidays, use festive decorations or colors to create a themed display that captures the spirit of the occasion.
- Interactive Dessert Stations: Set up a macaro station at your next gathering. Provide various fillings and toppings, allowing guests to customize their own treats. This interactive element adds fun and creativity to your event.
Ultimately, serving macaro is about showcasing their beauty and flavor. By incorporating these suggestions, you can create an unforgettable experience for your guests. So, gather your macaro and let your creativity shine!
Preserving and Reheating Macarons
To keep your homemade macaro fresh and delicious, proper storage is essential. Firstly, store your macaro in an airtight container. This helps to maintain its delicate texture and prevents it from absorbing unwanted odors. If you plan to enjoy them within a few days, refrigeration is a great option. In the fridge, your macaro will stay fresh for about 3 to 5 days. However, if you want to keep them longer, consider freezing them. When stored in the freezer, macaro can last up to 2 months. Just make sure to wrap them tightly in plastic wrap and place them in a vacuum-sealed bag or an airtight container to prevent freezer burn.
Additionally, always remember food safety tips. Ensure your macaro are completely cooled before storing them. This helps to prevent moisture buildup, which can lead to spoilage or bacterial growth. If you notice any signs of mold or an off smell, it’s best to discard them to avoid any health risks.
Reheating Methods
When it comes to reheating macaro, the goal is to preserve their delightful taste and texture. The oven is the best method for this. Preheat your oven to a low temperature of about 300°F (150°C). Place the macaro on a baking sheet lined with parchment paper. Cover them loosely with aluminum foil to retain moisture. Heat them for about 5 to 7 minutes. This gentle reheating will refresh their texture without drying them out.
If you’re in a hurry, the microwave can also work. Place a macaro on a microwave-safe plate and cover it with a damp paper towel. Heat it for about 10 to 15 seconds. However, be cautious not to overheat, as this can lead to a chewy texture.
For those who own an air fryer, it’s another excellent option. Set the air fryer to 300°F (150°C) and place the macaro inside for about 3 to 4 minutes. This method will give them a nice crispness while keeping the insides soft.
In summary, whether you choose to refrigerate or freeze your macaro, following these storage tips will ensure they remain a delightful treat. When reheating, opt for gentle methods to maintain their quality. With these techniques, you can enjoy your macaro just as if they were freshly made!
Conclusion
As we wrap up this delightful journey of making macaro from scratch, I hope you feel inspired and empowered to take on this rewarding culinary adventure. Remember, the beauty of macaro lies in its simplicity and versatility; with just a few key ingredients, you can create gourmet treats that are not only visually stunning but also deliciously satisfying. So, whether you’re a seasoned baker or a curious beginner, I encourage you to roll up your sleeves and give this recipe a try. You might just discover a new favorite dessert!
Share Your Creations
I would love to hear about your experiences! Feel free to share your results or ask any questions you may have. Additionally, don’t hesitate to experiment with different flavors and fillings to make these macaro truly your own. Cooking is all about creativity and fun, and macaro is the perfect canvas for your culinary imagination. So, gather your ingredients, invite a friend, and enjoy the process of creating these delightful treats together!
FAQs About Making Macaro
Here are some common questions you might have while making macaro, along with helpful answers to guide you through the process.
1. What is the secret to making perfect macaro?
To achieve perfect macarons, focus on precise measurements and technique. Use a kitchen scale for accuracy, and ensure your egg whites are at room temperature. Additionally, fold the batter gently to avoid overmixing, which can lead to flat macaro.
2. Can I use powdered sugar instead of granulated sugar?
While granulated sugar is preferred for macaro, you can use powdered sugar in a pinch. However, it may alter the texture slightly. If you do, make sure to sift it well to avoid clumps.
3. How do I prevent my macaro from cracking?
Cracking can occur due to overmixing or insufficient resting time. After piping your macaro, let them rest for 30-60 minutes until a skin forms. This helps them rise properly during baking and prevents cracks.
4. What fillings work best for macaro?
Macaro are highly customizable! Popular fillings include buttercream, ganache, and fruit preserves. You can also experiment with flavors like chocolate, vanilla, or even matcha to create unique combinations.
5. How should I store my macaro?
To keep your macaro fresh, store them in an airtight container at room temperature for up to 3 days. For longer storage, you can freeze them. Just make sure to separate layers with parchment paper to prevent sticking.