
Have you ever tasted a sauce that transforms your meal into a gourmet experience? Garlic aioli is that sauce! This creamy delight not only enhances the flavor of your dishes but also packs a nutritional punch. Rich in healthy fats and low in carbs, it’s a guilt-free way to elevate everything from sandwiches to grilled vegetables. Moreover, making aioli at home allows you to use fresh ingredients and customize the flavors to suit your palate. Whether you’re following a gluten-free, dairy-free, or vegan diet, garlic aioli can easily adapt to fit your needs. So, let’s dive into this culinary adventure and discover how to create the best homemade aioli that will impress your family and friends!
Table of Contents
Table of Contents
Garlic Aioli
Equipment
- 1 Food Processor For blending the ingredients.
- 1 Mixing Bowl Optional for hand whisking.
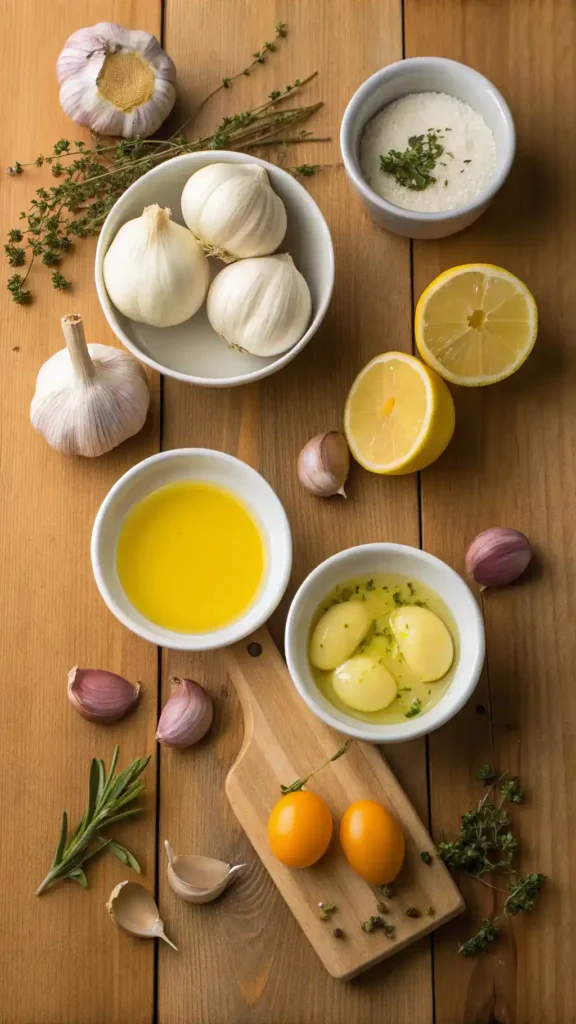
Ingredients
Base Ingredients
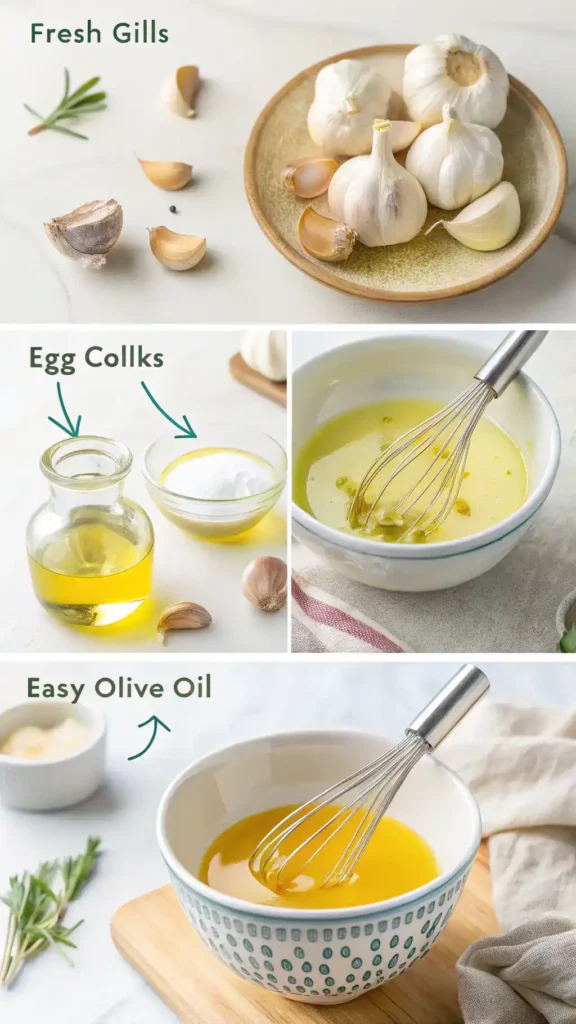
- 2 cloves Fresh Garlic Minced.
- 2 large Egg Yolks For traditional aioli.
Flavor Enhancers
- 1 tablespoon Dijon Mustard For added flavor.
- 1 tablespoon Lemon Juice Freshly squeezed.
- 1 cup Olive Oil High-quality for best results.
Seasoning
- to taste Salt
- to taste Pepper
Instructions
Gather Your Ingredients
- Start by collecting fresh garlic, egg yolks, Dijon mustard, lemon juice, and high-quality olive oil. Having everything ready makes the process smoother.
Blend the Base
- Place the egg yolks, minced garlic, and Dijon mustard in a food processor. Blend these ingredients until smooth, which should take about 30 seconds.
Emulsify
- With the processor running, gradually drizzle in the olive oil. This step is crucial; adding the oil too quickly can cause the aioli to separate. Aim for a slow, steady stream.
Season to Taste
- Once the mixture is creamy, add a splash of lemon juice, salt, and pepper. Blend again to combine. Taste and adjust the seasoning as needed.
Check the Consistency
- Your garlic aioli should be thick and creamy. If it’s too thin, you can add a bit more oil while blending. Conversely, if it’s too thick, a few drops of water can help.
Store Properly
- Transfer your garlic aioli to an airtight container. It’s best enjoyed fresh but can be stored in the refrigerator for up to 3-5 days.
Video
Notes
| Calories | Fat | Protein | Carbs |
|---|---|---|---|
| 120 | 12g | 1g | 1g |
Key Benefits
Garlic aioli is not just a simple condiment; it’s a powerhouse of flavor and nutrition. This creamy sauce is rich in healthy fats, making it an excellent choice for those looking to enhance their meals without the guilt. With its versatile nature, aioli can elevate a variety of dishes, from sandwiches to vegetables. Moreover, making it at home ensures you control the ingredients, allowing for a fresher and customized flavor profile. Whether you follow a gluten-free, dairy-free, or vegan diet, aioli can be adapted to fit your needs, making it an inclusive addition to your culinary repertoire.
Health Benefits
Garlic aioli is rich in healthy fats, which are essential for maintaining good health. Additionally, it is low in carbs and nutrient-dense, making it a smart choice for those mindful of their dietary intake. By incorporating garlic aioli into your meals, you not only enhance the flavor but also add nutritional value.
Flavor Enhancer
This creamy sauce is a fantastic flavor enhancer. It elevates dishes, transforming ordinary meals into extraordinary culinary experiences. Whether you’re drizzling it over grilled vegetables or slathering it on a sandwich, garlic aioli brings a delightful richness that is hard to resist.
Homemade Quality
One of the best aspects of garlic aioli is that you can easily make it at home. By using fresh ingredients, you ensure that your aioli is not only delicious but also free from preservatives. Furthermore, you can customize the flavors to suit your taste preferences, making it a truly personal condiment.
Diet-Friendly
Garlic aioli is incredibly versatile and can cater to various dietary needs. It is gluten-free, dairy-free, and can be made vegan, allowing everyone to enjoy its creamy goodness. This adaptability makes garlic aioli a fantastic addition to any meal, regardless of dietary restrictions.
Ingredients
To craft the perfect garlic aioli, you will need a handful of simple yet impactful ingredients. The primary components include fresh garlic, egg yolks, and high-quality olive oil. For an added zing, a splash of lemon juice and a teaspoon of Dijon mustard can enhance the flavor. Season with salt and pepper to taste. If you’re looking for alternatives, consider using aquafaba instead of egg yolks for a vegan version, or switch to avocado oil for a lighter, nutty flavor.
How to Make Garlic Aioli
Creating garlic aioli is a straightforward process that requires minimal effort. Follow these simple steps to whip up this delicious condiment:
- Gather Your Ingredients: Start by collecting fresh garlic, egg yolks, Dijon mustard, lemon juice, and high-quality olive oil. Having everything ready makes the process smoother.
- Blend the Base: Place the egg yolks, minced garlic, and Dijon mustard in a food processor. Blend these ingredients until smooth, which should take about 30 seconds.
- Emulsify: With the processor running, gradually drizzle in the olive oil. This step is crucial; adding the oil too quickly can cause the aioli to separate. Aim for a slow, steady stream.
- Season to Taste: Once the mixture is creamy, add a splash of lemon juice, salt, and pepper. Blend again to combine. Taste and adjust the seasoning as needed.
- Check the Consistency: Your garlic aioli should be thick and creamy. If it’s too thin, you can add a bit more oil while blending. Conversely, if it’s too thick, a few drops of water can help.
- Store Properly: Transfer your garlic aioli to an airtight container. It’s best enjoyed fresh but can be stored in the refrigerator for up to 3-5 days.
Remember, the key to a perfect garlic aioli lies in the emulsification. Therefore, ensure the oil is added slowly to maintain a smooth, creamy consistency. If you prefer a hand method, whisk the ingredients in a mixing bowl while slowly incorporating the oil.
Additionally, if your aioli separates, don’t worry! Start over with a new egg yolk and slowly incorporate the separated mixture. This way, you can salvage your efforts and enjoy the rich flavors of garlic aioli.
Pro Tips, Variations, and Common Problems
While making garlic aioli is simple, there are a few common pitfalls to avoid. If your aioli separates, it’s often due to adding the oil too quickly. To remedy this, start over with a new egg yolk and slowly incorporate the separated mixture. Additionally, if your aioli tastes too bitter, consider reducing the amount of raw garlic or balancing it with more lemon juice. For those seeking variety, try adding a pinch of cayenne pepper for a spicy kick or incorporate fresh herbs like basil or parsley for a fragrant twist. Roasted garlic can also provide a sweeter, milder flavor profile.
Pro Tips
Here are some insider tips to ensure your garlic aioli turns out perfectly every time:
- Use fresh garlic for the best flavor; older garlic can taste bitter.
- When emulsifying, ensure your ingredients are at room temperature to help them blend smoothly.
- For a creamier texture, add a teaspoon of water if the aioli is too thick.
- Experiment with different oils; avocado oil offers a lighter taste, while extra virgin olive oil provides a robust flavor.
Creative Variations
Garlic aioli is incredibly versatile, so don’t hesitate to get creative:
- For a spicy aioli, mix in some sriracha or chipotle powder.
- Try adding roasted red peppers for a sweet, smoky flavor.
- Herb-infused aioli can be made by blending in fresh dill, cilantro, or chives.
- For a vegan option, substitute egg yolks with aquafaba, the liquid from canned chickpeas.
Common Problems and Solutions
Here are some frequent challenges you might face while making garlic aioli, along with solutions:
- Separation: If your aioli separates, it’s likely due to adding the oil too quickly. Start with a new egg yolk and slowly whisk in the separated mixture.
- Bitterness: If your aioli tastes too bitter, reduce the amount of raw garlic or balance it with more lemon juice.
- Texture Issues: If the aioli is too thick, add a teaspoon of water to achieve your desired consistency.
- Over-seasoning: Always taste as you go. If it’s too salty, add a bit more lemon juice to balance the flavors.
Serving Suggestions
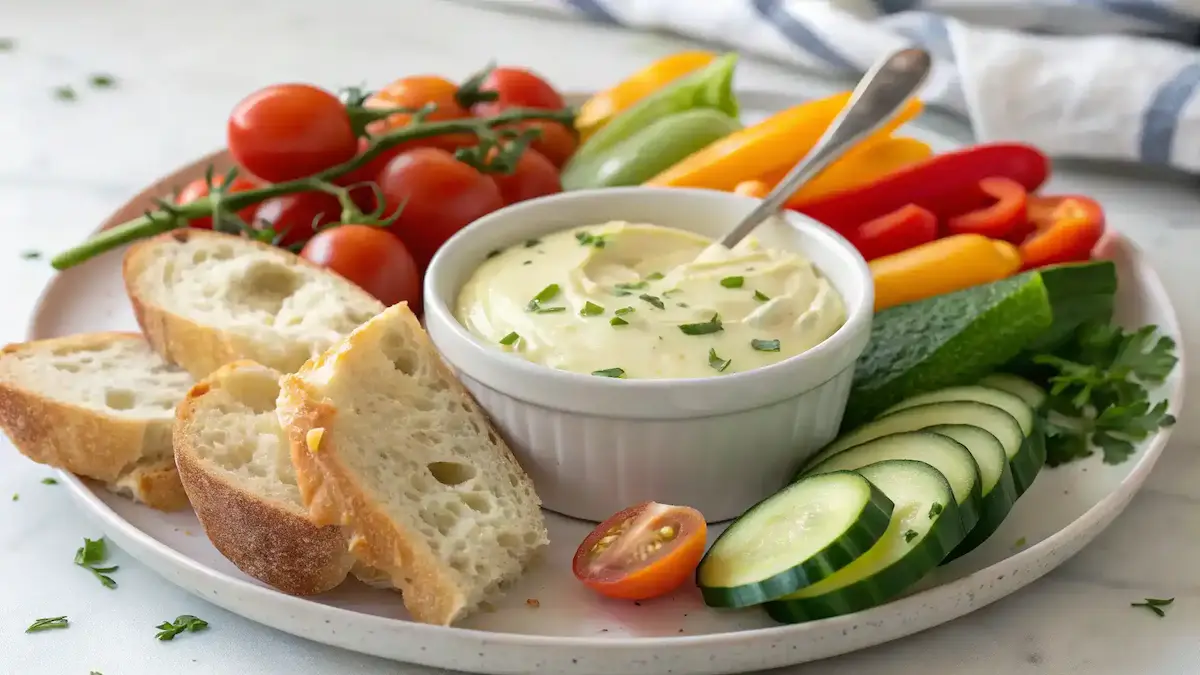
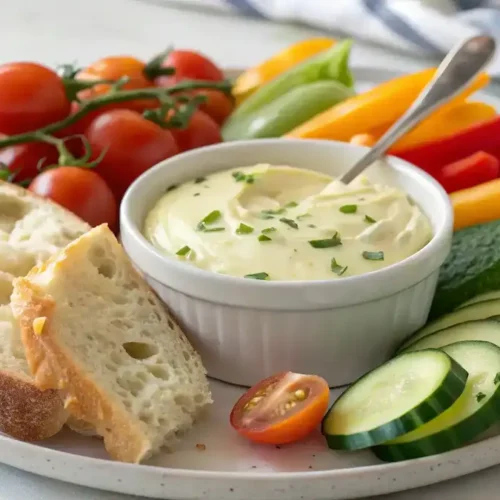
Garlic aioli is incredibly versatile and can be served in numerous ways. To impress your guests, consider these creative serving ideas that will elevate your dining experience. Firstly, spread garlic aioli on sandwiches or wraps for a creamy texture and robust flavor. It pairs wonderfully with grilled vegetables, adding a rich layer to your veggie platters. Additionally, seafood lovers can enjoy garlic aioli as a dipping sauce for shrimp or fish. Furthermore, consider using it as a salad dressing base for an unexpected twist that will elevate your greens.
For a casual gathering, serve garlic aioli in a small bowl alongside a colorful array of fresh vegetables, such as carrots, cucumbers, and bell peppers. This not only looks appealing but also encourages guests to mingle and snack. Alternatively, for a more elegant presentation, drizzle the aioli artistically over grilled fish or roasted chicken. This adds a gourmet touch that is sure to impress.
If you’re hosting a family-style meal, place a generous bowl of garlic aioli at the center of the table. Pair it with crispy fries or sweet potato wedges for a delightful dipping experience. Moreover, you can even use garlic aioli as a flavorful spread for burgers or wraps, enhancing the overall taste of your dish.
Lastly, don’t forget about the garnishes! A sprinkle of fresh herbs, such as parsley or chives, can add a pop of color and freshness. Additionally, a few lemon wedges on the side can provide a zesty contrast that complements the creamy garlic aioli beautifully. With these serving suggestions, your garlic aioli will not only taste amazing but also look stunning on the table!
Preserving and Reheating Garlic Aioli
Garlic aioli is a delightful addition to many dishes, but to enjoy its rich flavor and creamy texture at their best, proper storage and reheating are essential. First, let’s talk about how to store your homemade garlic aioli. The best way to keep it fresh is by placing it in an airtight container and storing it in the refrigerator. This method helps to maintain its quality and flavor. Ideally, you should consume your garlic aioli within 3-5 days. Always check for signs of spoilage, such as an off smell or discoloration, before using it.
If you want to store it for a longer period, consider freezing it. In this case, use a vacuum-sealed bag or an airtight container, and it can last up to 3 months in the freezer. However, keep in mind that freezing may slightly alter its texture. To prevent bacterial growth, always ensure your utensils are clean when scooping out aioli, and avoid leaving it at room temperature for extended periods.
Reheating Methods
Now, let’s discuss how to reheat garlic aioli without compromising its deliciousness. Generally, reheating is not recommended, as garlic aioli is best enjoyed fresh. However, if you find yourself needing to warm it up, the stovetop method is your best bet. Start by placing the aioli in a small saucepan over low heat. Stir it gently and continuously to prevent it from separating or becoming too hot.
If it seems too thick, add a teaspoon of water or lemon juice to refresh its creamy texture. Alternatively, you can use the microwave, but be cautious. Place the aioli in a microwave-safe bowl and heat it in short bursts of 10-15 seconds, stirring in between. This way, you can control the temperature and avoid overheating. Remember, the key is to warm it gently, as high heat can lead to a change in flavor and texture. Overall, while garlic aioli is best served fresh, these methods can help you enjoy it even after a few days.
Conclusion
In summary, making your own Garlic Aioli is not only simple but also incredibly rewarding. By following the key steps of emulsifying fresh garlic, egg yolks, and high-quality olive oil, you can create a creamy, flavorful condiment that enhances any dish. This recipe is versatile, allowing you to customize flavors and adapt it to various dietary needs, making it a fantastic choice for everyone. So, gather your ingredients and give it a try; you might just find that this homemade aioli becomes a staple in your kitchen.
Share Your Experience
We would love to hear about your culinary adventures! Feel free to share your results or ask any questions you may have. Additionally, don’t hesitate to experiment with different variations or pairings to make this Garlic Aioli your own. Cooking is all about creativity and enjoyment, and this recipe is a perfect opportunity to explore new flavors and techniques. Remember, the kitchen is your playground, so have fun with it!
FAQ
What is Garlic Aioli?
Garlic aioli is a creamy sauce made primarily from garlic, egg yolks, and olive oil. It serves as a versatile condiment that enhances the flavor of various dishes, making it a favorite in many kitchens.
How long does homemade Garlic Aioli last?
Homemade garlic aioli typically lasts about 3-5 days when stored in an airtight container in the refrigerator. Always check for signs of spoilage, such as off smells or discoloration, before using.
Can I make Garlic Aioli without eggs?
Yes, you can make garlic aioli without eggs by using aquafaba, the liquid from canned chickpeas. This vegan alternative mimics the emulsifying properties of egg yolks, allowing you to create a delicious aioli.
What can I use Garlic Aioli for?
Garlic aioli is incredibly versatile. You can use it as a spread for sandwiches, a dip for vegetables, or a sauce for grilled meats and seafood. Additionally, it can elevate salads when used as a dressing base.
Why did my Garlic Aioli separate?
If your garlic aioli separates, it’s likely due to adding the oil too quickly during the emulsification process. To fix this, start over with a new egg yolk and slowly whisk in the separated mixture until it comes together again.