
Are you ready to elevate your dessert game? This quick and smooth modeling chocolate recipe is not only easy to make but also incredibly versatile. Whether you’re a beginner or an experienced baker, this recipe will help you create stunning edible decorations that are sure to impress. With its smooth texture, you can craft intricate designs that will take your cakes and cupcakes to the next level. Moreover, you can customize it with various colors and flavors, making it a delightful addition to any baking project.
Table of Contents
Table of Contents
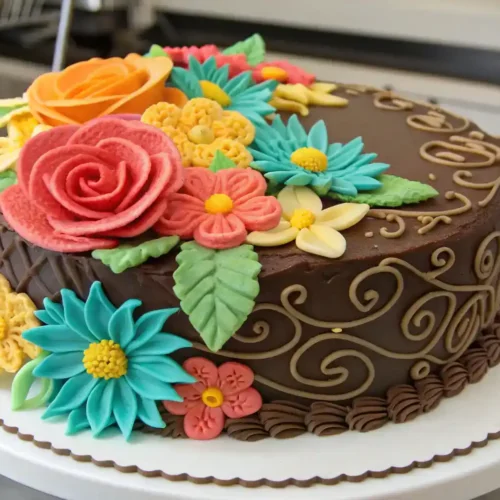
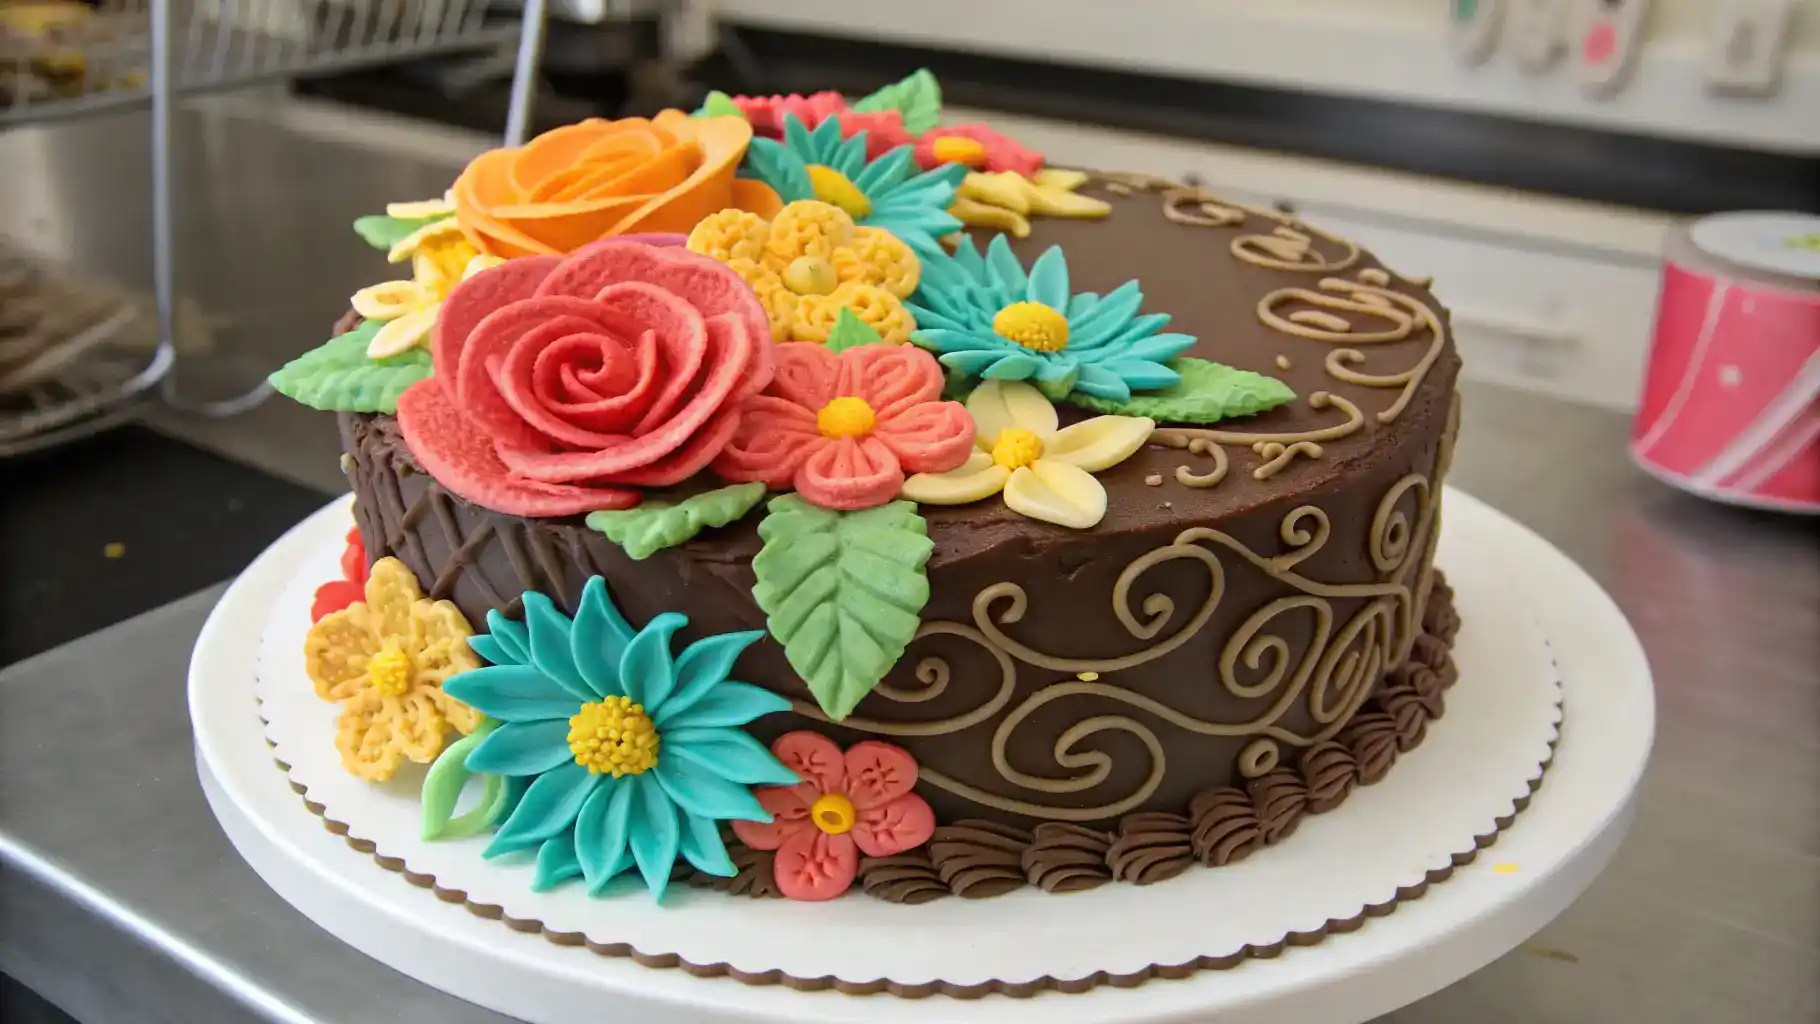
modeling chocolate recipe
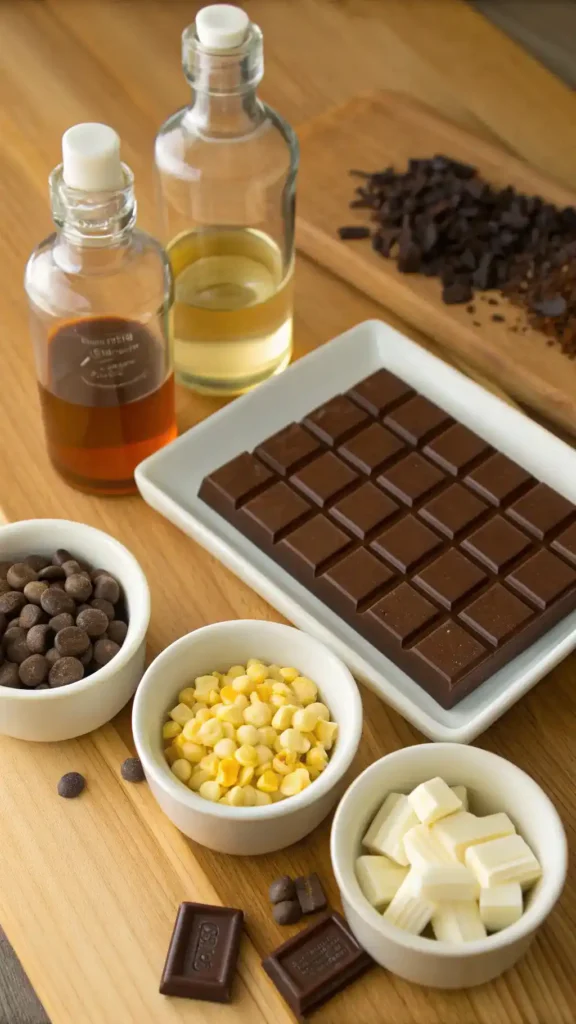
Ingredients
Chocolate
- 8 oz Chocolate (Dark or White) Choose high-quality chocolate for the best flavor.
- 1/4 cup Corn Syrup Helps achieve a smooth, pliable texture.
Optional Ingredients
- 1 tbsp Vegetable Shortening Optional for a softer texture.
- as needed drops Food Coloring Use natural dyes when possible.
- 1 tsp Flavor Extracts Optional, such as vanilla or almond.
Instructions
Gather Your Ingredients
- Start by collecting high-quality chocolate (dark or white) and corn syrup. You may also want to have food coloring and flavor extracts on hand for customization.
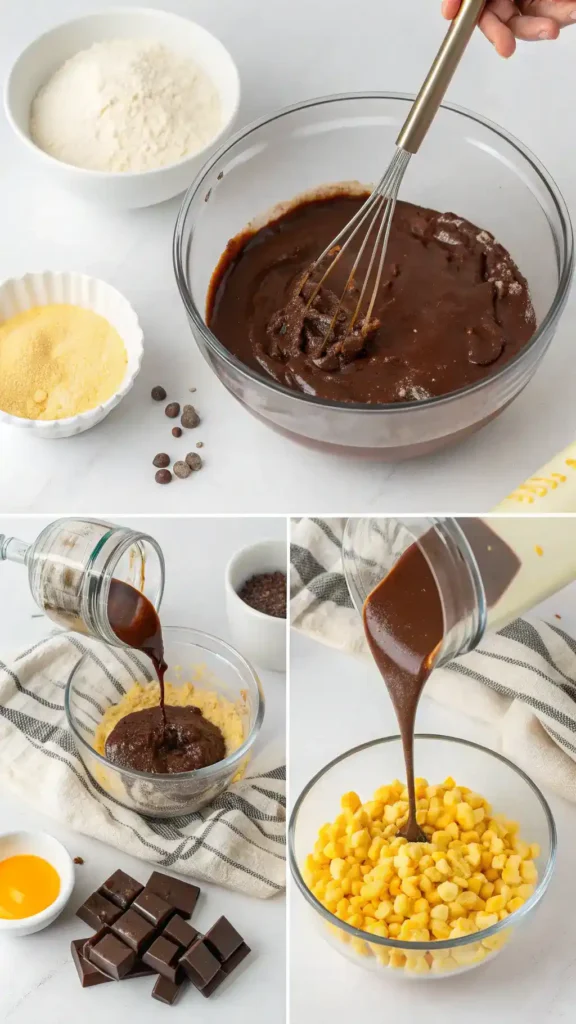
Melting the Chocolate
- Chop your chocolate into small pieces. Then, melt it using a microwave or a double boiler. If using a microwave, heat in short intervals of 20 seconds, stirring in between until smooth.
Mixing in Corn Syrup
- Once your chocolate is melted, remove it from heat. Gradually add the corn syrup, stirring continuously until fully combined.
Kneading the Mixture
- Allow the mixture to cool slightly, then transfer it to a clean work surface. Knead the chocolate until it reaches a pliable consistency.
Resting the Chocolate
- Wrap your modeling chocolate in plastic wrap. Let it rest at room temperature for at least a few hours or overnight.
Coloring and Flavoring (Optional)
- If you want to add color or flavor, now is the time. Divide your modeling chocolate into portions and knead in food coloring or flavor extracts until evenly distributed.
Ready to Use
- Your modeling chocolate is now ready for use! Roll it out, shape it, or mold it into your desired designs.
Notes
Key Benefits
Modeling chocolate recipe is not just a delightful treat; it offers numerous advantages that make it a favorite among bakers and dessert enthusiasts alike. Here are some key benefits of this versatile ingredient:
- Versatile Medium: Modeling chocolate recipe serves as an excellent alternative to fondant. You can use it for cake decorating, edible sculptures, and various dessert crafts.
- Easy to Work With: Its pliable texture makes it simple to mold and shape, which is especially beneficial for beginners. Consequently, you can create intricate designs without the stress.
- Customizable: You can easily add colors and flavors to modeling chocolate recipe. This customization enhances both the visual appeal and taste of your desserts, making them truly unique.
- Smooth Texture: The smooth consistency of modeling chocolate allows for clean edges and detailed designs. Therefore, your creations will look polished and professional.
- Edible Decorations: Unlike many other decorative elements, modeling chocolate is entirely edible. This means your beautiful designs can be enjoyed as part of the dessert.
From a nutritionist’s perspective, modeling chocolate can be a more wholesome option compared to other sugary decorations. It typically contains fewer artificial ingredients, especially when you use high-quality chocolate and natural flavorings. Thus, you can indulge in your baking projects with a bit more peace of mind.
Ingredients for Quick & Smooth Modeling Chocolate Recipe
Creating the perfect modeling chocolate recipe starts with selecting high-quality ingredients. Each component not only contributes to the texture and flavor but also offers unique health benefits. Here’s what you’ll need:
- Chocolate (Dark or White): Choose high-quality chocolate for the best flavor. Dark chocolate is rich in antioxidants, which can support heart health, while white chocolate provides a creamy sweetness.
- Corn Syrup: This ingredient helps achieve that smooth, pliable texture. It also acts as a humectant, keeping your modeling chocolate recipe moist and preventing it from drying out.
- Vegetable Shortening (Optional): If you prefer a softer texture, vegetable shortening can be a great substitute for corn syrup. It adds creaminess and helps maintain flexibility.
- Food Coloring (Optional): Brighten up your creations with food coloring. Opt for natural dyes when possible, as they are generally healthier and free from artificial additives.
- Flavor Extracts (Optional): Enhance the taste of your modeling chocolate recipe with extracts like vanilla or almond. These can add a delightful twist to your creations, making them even more enjoyable.
By carefully selecting these ingredients, you ensure that your modeling chocolate not only looks beautiful but also tastes delicious. Remember, the quality of your chocolate is key, so choose wisely for the best results!
How to Make Modeling Chocolate Recipe
Creating your own modeling chocolate recipe is a delightful process that opens up a world of edible creativity. Follow these simple steps to make your very own modeling chocolate, perfect for cake decorating and edible art.
- Gather Your Ingredients: Start by collecting high-quality chocolate (dark or white) and corn syrup. You may also want to have food coloring and flavor extracts on hand for customization.
- Melting the Chocolate: Chop your chocolate into small pieces. Then, melt it using a microwave or a double boiler. If using a microwave, heat in short intervals of 20 seconds, stirring in between until smooth. This step is crucial, as overheating can ruin the chocolate.
- Mixing in Corn Syrup: Once your chocolate is melted, remove it from heat. Gradually add the corn syrup, stirring continuously until fully combined. The mixture should be glossy and smooth, indicating that it’s ready for the next step.
- Kneading the Mixture: Allow the mixture to cool slightly, then transfer it to a clean work surface. Knead the chocolate until it reaches a pliable consistency. This process may take a few minutes, but it’s essential for achieving the right texture.
- Resting the Chocolate: Wrap your modeling chocolate in plastic wrap. Let it rest at room temperature for at least a few hours or overnight. This resting period allows the chocolate to firm up, making it easier to work with later.
- Coloring and Flavoring (Optional): If you want to add color or flavor, now is the time. Divide your modeling chocolate into portions and knead in food coloring or flavor extracts until evenly distributed. This step adds a personal touch to your creations.
- Ready to Use: Your modeling chocolate is now ready for use! Roll it out, shape it, or mold it into your desired designs. Whether you’re crafting decorations for a cake or creating edible art, the possibilities are endless.
By following these steps, you’ll have a smooth and versatile modeling chocolate recipe that’s perfect for all your baking projects. Enjoy the process and let your creativity shine!
Pro Tips, Variations & Common Problems
Creating the perfect modeling chocolate recipe can be a delightful experience, but it’s not without its challenges. Here are some pro tips and variations to help you along the way, ensuring your modeling chocolate turns out beautifully every time.
Pro Tips
– Always use high-quality chocolate. This will enhance the flavor and texture of your modeling chocolate recipe. Dark or white chocolate works well, but ensure it’s free from additives.
– If your modeling chocolate is too sticky, knead in a small amount of powdered sugar. This will help achieve the right consistency without compromising the flavor.
– Keep your workspace cool and dry. Humidity can negatively affect the texture, making it difficult to work with. If you live in a humid area, consider using a dehumidifier.
– When melting chocolate, do so in short intervals. This prevents overheating, which can cause the chocolate to seize. Stir between intervals for even melting.
Variations
– For a unique twist, try using flavored chocolate, such as orange or mint. This adds an exciting layer of taste to your modeling chocolate recipe.
– You can also incorporate food coloring to create vibrant shades. Gel food coloring works best, as it won’t alter the consistency of your chocolate.
– If you want a softer texture, consider substituting corn syrup with vegetable shortening. This will create a more pliable modeling chocolate, ideal for intricate designs.
Common Problems & Solutions
– If your modeling chocolate cracks while shaping, it may be too dry. To remedy this, knead in a bit of corn syrup or vegetable shortening until it becomes pliable again.
– Conversely, if it’s too soft and difficult to work with, let it rest at room temperature for a bit. This will help firm it up before you start shaping.
– Should you notice a grainy texture, it’s likely due to overheating the chocolate. In this case, try adding a small amount of warm corn syrup to smooth it out.
– Lastly, if your modeling chocolate is too oily, it may have been over-kneaded. Allow it to rest, and then knead gently to bring it back to the right consistency.
By following these tips and variations, you’ll be well on your way to mastering your modeling chocolate recipe. Remember, practice makes perfect, so don’t hesitate to experiment and find what works best for you!
Serving Suggestions
Modeling chocolate recipe is not only a delightful treat but also a versatile medium for creating stunning edible art. It fits beautifully into various occasions, making it a must-have for any baking enthusiast. Here are some engaging serving suggestions to inspire your creativity:
- Birthday Celebrations: Use modeling chocolate to craft whimsical cake decorations, such as colorful flowers or fun characters. These edible embellishments will surely impress guests and make the birthday cake unforgettable.
- Weddings: For a romantic touch, consider creating elegant cake toppers or intricate lace designs. Modeling chocolate can mimic delicate details, adding sophistication to your wedding cake.
- Themed Parties: Whether it’s a superhero or princess theme, modeling chocolate can be molded into various shapes and figures. This customization allows you to align your dessert with the party theme, enhancing the overall experience.
- Holidays: During festive seasons, use modeling chocolate to create seasonal decorations. For instance, shape it into ornaments for Christmas cookies or spooky figures for Halloween treats.
- Edible Gifts: Create personalized chocolate sculptures or decorative boxes filled with treats. These thoughtful gifts are perfect for special occasions, showcasing your culinary skills and creativity.
Furthermore, consider presenting your modeling chocolate creations on beautiful platters or cake stands. This not only elevates the visual appeal but also invites guests to admire your artistry. Overall, the possibilities are endless, and with a little imagination, your modeling chocolate can transform any dessert into a show-stopping centerpiece.
Preserving and Reheating Your Modeling Chocolate Recipe
Storing and reheating your modeling chocolate properly is essential for maintaining its delightful flavor, smooth texture, and overall quality. Here are some friendly tips to help you keep your modeling chocolate in top shape.
Storage Tips
To ensure your modeling chocolate stays fresh, store it in an airtight container at room temperature. This method helps prevent it from drying out. If you need to keep it for an extended period, consider refrigerating it. In the fridge, your modeling chocolate can last for about two weeks. Alternatively, if you want to store it even longer, freezing is a great option. When frozen, it can remain good for up to six months. However, make sure to wrap it tightly in plastic wrap and place it in a vacuum-sealed bag or an airtight container to prevent freezer burn. Additionally, always remember to check for any signs of spoilage, such as an off smell or unusual texture, to avoid any food safety issues.
Reheating Methods
When it comes to reheating your modeling chocolate, gentle methods work best to preserve its taste and texture. The microwave is a convenient option, but be cautious. Start by breaking the chocolate into small pieces and placing them in a microwave-safe bowl. Heat it in short intervals of 10-15 seconds, stirring in between, until it becomes soft and pliable. Alternatively, you can use a stovetop method. Place a heatproof bowl over a pot of simmering water, ensuring the bowl doesn’t touch the water. Stir continuously until the chocolate is warm and manageable. If you prefer using an air fryer, set it to a low temperature and check frequently to avoid overheating. If your modeling chocolate seems dry, adding a tiny bit of vegetable shortening can help refresh its texture. Always remember to reheat slowly and carefully, as this will ensure your modeling chocolate remains smooth and ready for your creative projects.
Conclusion
In summary, this quick and smooth modeling chocolate recipe is not only simple to make but also incredibly versatile. Its delightful texture and ease of use make it a fantastic choice for both novice and experienced bakers alike. Whether you’re crafting beautiful cake decorations or playful edible art, this recipe opens the door to endless creative possibilities. So, I encourage you to roll up your sleeves and give it a try! You might just discover a new favorite way to express your culinary creativity.
Share Your Experience
I would love to hear about your adventures with this modeling chocolate recipe! Feel free to share your results or ask any questions you may have. Additionally, don’t hesitate to experiment with different flavors or colors to make this recipe truly your own. Remember, cooking is all about having fun and exploring your creativity, and this modeling chocolate is a perfect medium to do just that. Happy baking!
FAQs About Modeling Chocolate Recipe
Here are some common questions about modeling chocolate that can help you on your baking journey.
1. What is modeling chocolate made of?
Modeling chocolate is primarily made from chocolate and corn syrup. You can use either dark or white chocolate, depending on your preference. Additionally, you can add flavor extracts or food coloring to customize it further.
2. How do I store modeling chocolate?
To store modeling chocolate, wrap it tightly in plastic wrap and place it in an airtight container. Keep it at room temperature, away from direct sunlight. This way, it will remain pliable and fresh for future use.
3. Why is my modeling chocolate too sticky?
If your modeling chocolate is too sticky, it may be due to humidity or excess corn syrup. To fix this, knead in a small amount of powdered sugar until you achieve the desired consistency. Moreover, working in a cooler environment can help prevent stickiness.
4. Can I use modeling chocolate for cake decorations?
Absolutely! Modeling chocolate is perfect for cake decorations. You can shape it into flowers, figures, or any design you like. Additionally, it can be rolled out and used to cover cakes, providing a smooth finish that looks stunning.
5. How long does modeling chocolate last?
When stored properly, modeling chocolate can last for several months. However, for the best quality, it’s recommended to use it within a month. If you notice any changes in texture or smell, it’s best to discard it.