
Welcome to the world of Ninja Creami recipes, where indulgence meets creativity! If you’re looking for a way to enjoy smooth, velvety desserts without the guilt, you’ve come to the right place. These recipes not only offer a creamy texture that rivals store-bought ice cream, but they also allow for customization, enabling you to tailor flavors to your personal preferences.
By using fresh ingredients, you can create healthier alternatives that are both nutritious and delicious. Moreover, the convenience of quick preparation and easy cleanup makes Ninja Creami an ideal choice for busy individuals. Whether you’re vegan, dairy-free, or simply seeking a delightful treat, these recipes cater to various dietary needs. So, let’s dive in and discover how to make these delightful frozen treats at home!
Table of Contents
Table of Contents
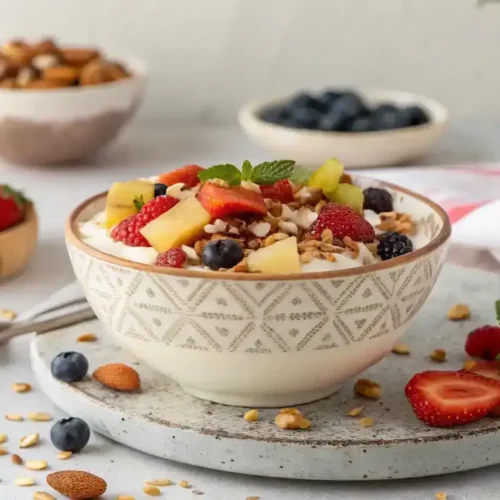
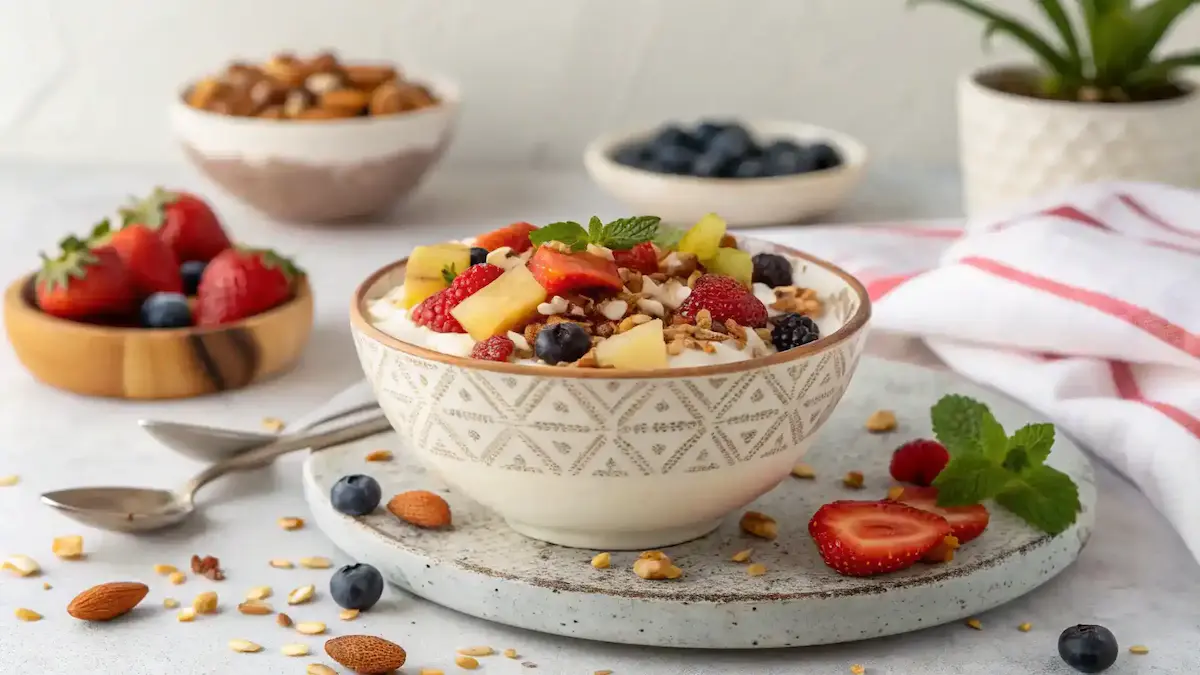
ninja creami recipes
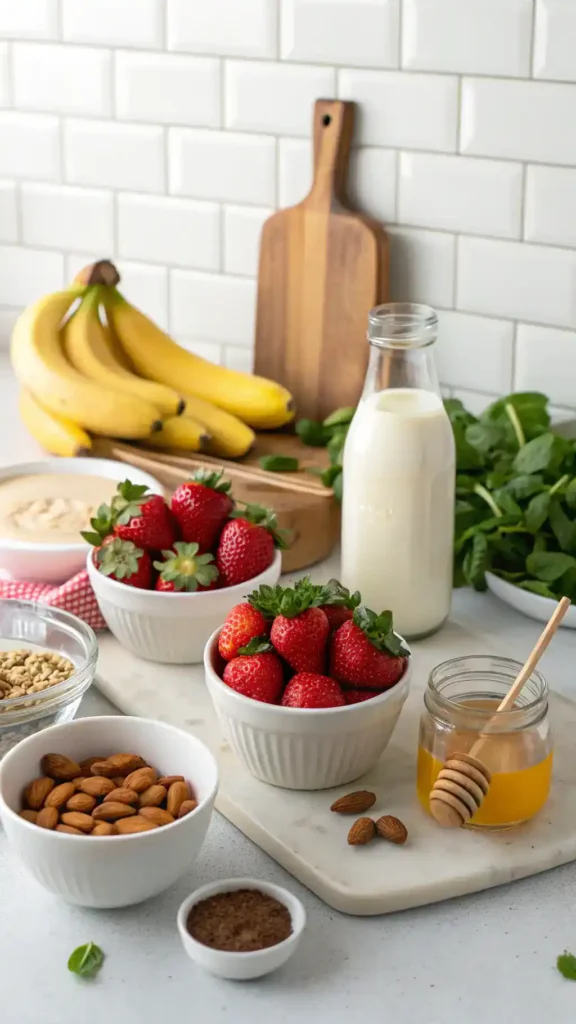
Ingredients
Fruits
- 2 medium Bananas Ripe for sweetness.
- 1 cup Strawberries Fresh or frozen.
Sweeteners
- 2 tablespoons Honey Can substitute with maple syrup or agave nectar.
- 1 cup Almond Milk Or any dairy alternative.
Flavorings
- 1 teaspoon Vanilla Extract For added flavor.
- 2 tablespoons Cocoa Powder Optional for chocolate flavor.
Optional Add-ins
- 1/4 cup Nuts Chopped for texture.
- 1/4 cup Chocolate Chips For extra sweetness.
Instructions
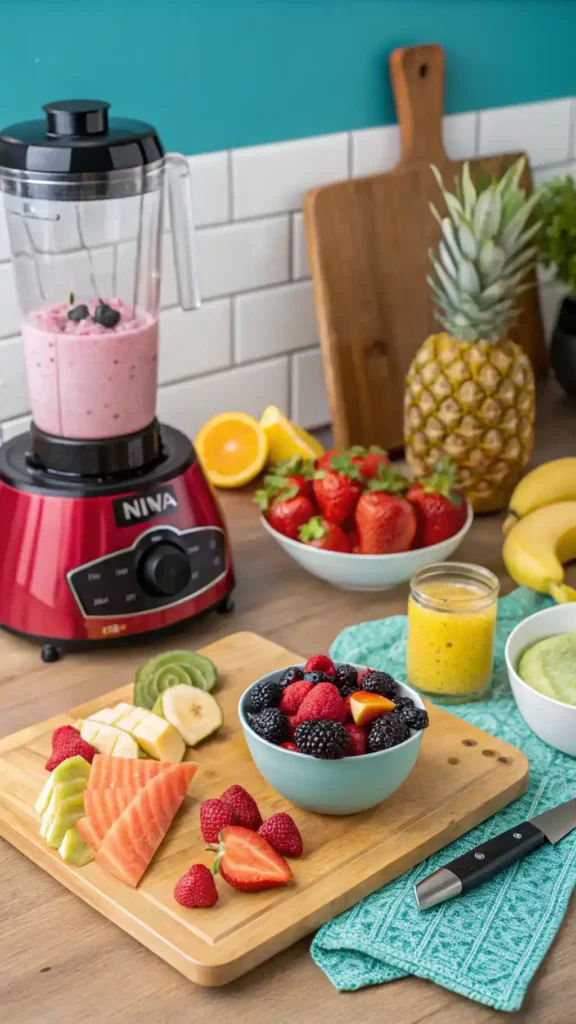
- Start by selecting your favorite fresh fruits, sweeteners, and dairy alternatives. Blend these ingredients until you achieve a smooth mixture. This step is crucial for a creamy texture.
- Next, pour the blended mixture into the Ninja Creami container. Ensure it’s filled to the appropriate line. Then, freeze it for at least 24 hours. This waiting period is essential for setting the base for creaminess.
- After the mixture is fully frozen, it’s time to process it in the Ninja Creami machine. Follow the manufacturer’s instructions carefully. This step is vital for achieving the desired creamy consistency that mimics store-bought ice cream.
- Finally, scoop your creation into bowls or cones. Garnish with fresh fruits, nuts, or a drizzle of honey for an extra touch. Enjoy your homemade Ninja Creami recipes with family and friends!
Notes
| Calories | Fat | Protein | Carbs |
|---|---|---|---|
| 150 | 5g | 2g | 25g |
Key Benefits
Ninja Creami recipes offer a delightful way to enjoy homemade frozen treats. One of the key benefits is the creamy texture that mimics store-bought ice cream, allowing you to indulge without the guilt. Additionally, these recipes provide customization, enabling you to experiment with flavors and ingredients that suit your taste. By using fresh fruits and natural sweeteners, you can create healthier alternatives to traditional desserts. The convenience of quick preparation and easy cleanup makes Ninja Creami an ideal choice for busy individuals. Furthermore, the versatility of these recipes means they can cater to various dietary preferences, including vegan and dairy-free options.
Creamy Texture
First thing to remember is that the creamy texture of Ninja Creami recipes is simply irresistible. You can indulge in smooth, velvety desserts that satisfy your sweet tooth without any guilt. This is especially true when you use fresh ingredients, which enhance the overall flavor and mouthfeel.
Customization
Moreover, customization is a significant perk. You can tailor flavors to your personal preferences, mixing and matching ingredients to create your dream dessert. For example, if you love tropical flavors, you might combine mango and coconut for a refreshing treat.
Healthier Alternatives
Another key point is the ability to make healthier alternatives. By using fresh fruits and natural sweeteners like honey or maple syrup, you can enjoy nutritious treats that are both satisfying and guilt-free. This means you can indulge in your favorite flavors while still being mindful of your health.
Convenience
Additionally, the convenience factor cannot be overlooked. Ninja Creami recipes are quick to prepare, and cleanup is a breeze. You can whip up a delicious dessert in no time, making it perfect for those busy weeknights or spontaneous gatherings.
Versatility
Lastly, the versatility of Ninja Creami recipes is impressive. They can easily accommodate various dietary needs, whether you’re vegan, dairy-free, or simply looking for a lighter option. This means everyone can enjoy a delicious frozen treat, regardless of their dietary restrictions.
Ingredients
To create delicious Ninja Creami recipes, you will need a few simple ingredients. Fresh fruits like bananas, strawberries, and mangoes serve as the foundation for your frozen treats, offering natural sweetness and vibrant flavors. Additionally, sweeteners such as honey, maple syrup, or agave nectar can enhance the taste without overpowering it. For a creamy base, consider dairy alternatives like almond milk, coconut cream, or oat milk. Furthermore, flavorings like vanilla extract or cocoa powder add depth, while optional add-ins such as nuts, chocolate chips, or granola provide delightful texture and crunch.
How to Make Ninja Creami Recipes
Making Ninja Creami recipes is a straightforward process that anyone can master. Follow these simple steps to create your own creamy, delicious frozen treats at home.
- Blend Your Ingredients: Start by selecting your favorite fresh fruits, sweeteners, and dairy alternatives. For example, bananas and strawberries work wonderfully together. Blend these ingredients until you achieve a smooth mixture. This step is crucial for a creamy texture.
- Pour and Freeze: Next, pour the blended mixture into the Ninja Creami container. Ensure it’s filled to the appropriate line. Then, freeze it for at least 24 hours. This waiting period is essential for setting the base for creaminess.
- Process the Mixture: After the mixture is fully frozen, it’s time to process it in the Ninja Creami machine. Follow the manufacturer’s instructions carefully. This step is vital for achieving the desired creamy consistency that mimics store-bought ice cream.
- Serve and Enjoy: Finally, scoop your creation into bowls or cones. Garnish with fresh fruits, nuts, or a drizzle of honey for an extra touch. Enjoy your homemade Ninja Creami recipes with family and friends!
By following these steps, you’ll not only save time but also create delicious, healthier alternatives to traditional desserts. Remember, the versatility of Ninja Creami recipes allows you to customize flavors to suit your preferences, making each treat uniquely yours.
Pro Tips, Variations, and Common Problems
To enhance your Ninja Creami experience, consider these pro tips. Adjust the texture by experimenting with the amount of liquid in your mixture; more liquid yields a softer treat, while less creates a denser dessert. Additionally, explore flavor combinations like chocolate-banana or strawberry-coconut for unique twists. Common problems include ice crystals forming or an inconsistent texture; therefore, ensure your mixture is well-blended and frozen solid before processing. For storage, keep your treats in airtight containers to maintain freshness and prevent freezer burn.
Texture Adjustments
To achieve that perfect creamy texture in your Ninja Creami recipes, remember that the balance of ingredients is key. If your mixture seems too thick, add a splash of your favorite dairy alternative, such as almond milk or coconut cream. Conversely, if it’s too runny, consider adding a bit more fruit or a thickening agent like chia seeds. This way, you can customize the consistency to your liking.
Flavor Combinations
When it comes to flavor, the sky’s the limit! For instance, try blending fresh mango with coconut cream for a tropical delight. Alternatively, combine ripe bananas with a touch of cocoa powder for a chocolatey treat. You can also add spices like cinnamon or nutmeg to elevate the flavor profile. These creative variations will keep your Ninja Creami recipes exciting and tailored to your taste.
Common Issues
One common issue is the formation of ice crystals, which can occur if the mixture isn’t blended well or if it’s not frozen long enough. To avoid this, blend your ingredients until completely smooth and freeze for a full 24 hours. If you encounter an inconsistent texture, try processing the mixture a second time in the Ninja Creami. This extra step can help achieve that velvety finish you desire.
Storage Tips
To preserve your Ninja Creami recipes, store them in airtight containers in the freezer. This method helps maintain their creamy texture and prevents freezer burn. If you find your treats becoming too hard, allow them to sit at room temperature for a few minutes before serving. This simple trick will restore their delightful creaminess, making your homemade frozen treats even more enjoyable.
Serving Suggestions
When it comes to serving your Ninja Creami creations, presentation is key. Firstly, consider using colorful bowls or cones to enhance the visual appeal. You can also pair your frozen treats with complementary snacks, such as homemade granola or fruit skewers, for a delightful experience. Additionally, garnishing with fresh fruits, sprinkles, or a drizzle of chocolate or caramel sauce can elevate the flavor and aesthetics of your dessert.
For a more festive touch, serve your Ninja Creami recipes at gatherings in small cups, allowing guests to sample different flavors. You might even create a DIY toppings bar, where everyone can customize their treats with nuts, chocolate chips, or fresh berries. This not only makes for an interactive experience but also showcases the versatility of Ninja Creami recipes.
Moreover, consider the season when serving. In warmer months, a refreshing mango or strawberry Ninja Creami can be a hit at outdoor barbecues. Conversely, during colder seasons, a rich chocolate or spiced pumpkin Ninja Creami can warm hearts and create cozy memories. Ultimately, the way you serve your Ninja Creami recipes can transform a simple dessert into a memorable occasion.
Preserving and Reheating Ninja Creami Recipes
To preserve your Ninja Creami recipes, store them in airtight containers in the freezer. This method helps maintain their creamy texture and prevents freezer burn. Generally, your delicious creations will stay fresh for about 1-2 weeks in the fridge and up to 2 months in the freezer. However, for optimal flavor and texture, it’s best to consume them sooner rather than later. Additionally, always label your containers with the date to keep track of freshness. For food safety, ensure that your Ninja Creami recipes are cooled completely before sealing them. This practice prevents condensation, which can lead to spoilage or bacterial growth.
Reheating Methods
When it comes to reheating your Ninja Creami recipes, the goal is to restore their delightful texture without drying them out. For best results, consider using the following methods:
Microwave: Place your frozen treat in a microwave-safe bowl. Heat it on low power for 15-30 seconds. Stir it gently and check the consistency. If it’s still too hard, continue heating in short intervals until it reaches your desired texture.
Stovetop: For a creamier result, transfer your Ninja Creami recipe to a saucepan. Add a splash of almond milk or coconut cream to introduce moisture. Heat it over low heat, stirring frequently, until warmed through. This method helps maintain that velvety texture.
Oven: Preheat your oven to 350°F (175°C). Place your Ninja Creami recipe in an oven-safe dish, cover it with foil, and heat for about 10-15 minutes. This gentle reheating method helps preserve the flavor and texture.
Regardless of the method you choose, always keep an eye on your treat to avoid overcooking. If you find it has become too firm, adding a little moisture can help refresh the dish. By following these tips, you can enjoy your Ninja Creami recipes just as they were meant to be savored!
Conclusion
As we wrap up this delightful journey into the world of Ninja Creami recipes, I hope you feel inspired to create your own creamy, velvety desserts at home. This recipe is not only simple but also incredibly versatile, making it a fantastic choice for anyone looking to indulge in healthier alternatives without sacrificing flavor. I encourage you to experiment with fresh fruits, natural sweeteners, and your favorite dairy alternatives to tailor the flavors to your personal preferences. Remember, cooking should be fun, and with Ninja Creami recipes, you have the perfect opportunity to get creative in the kitchen!
Share Your Creations
I would love to hear about your experiences! Please share your results in the comments below or ask any questions you may have. Additionally, don’t hesitate to explore various flavor combinations or pairings to make this recipe your own. Whether you’re a seasoned chef or a beginner, the joy of creating delicious frozen treats awaits you. So, gather your ingredients and get started on your Ninja Creami adventure today!
FAQ About Ninja Creami Recipes
Welcome to our FAQ section! Here, we address some common questions about Ninja Creami recipes to help you create the perfect frozen treats.
1. What is the best way to achieve a creamy texture in my Ninja Creami recipes?
To achieve that smooth, creamy texture, ensure your mixture is well-blended before freezing. Additionally, using a combination of fresh fruits and dairy alternatives like coconut cream can enhance creaminess. If your mixture seems too thick, consider adding a bit more liquid, such as almond milk, to adjust the consistency.
2. Can I customize my Ninja Creami recipes to suit dietary restrictions?
Absolutely! One of the best features of Ninja Creami recipes is their versatility. You can easily tailor flavors to meet various dietary needs, such as vegan or dairy-free. For instance, use almond milk or oat milk instead of dairy, and opt for natural sweeteners like maple syrup or agave nectar.
3. How long should I freeze my mixture before processing it in the Ninja Creami?
For optimal results, freeze your mixture for at least 24 hours. This ensures it is solid enough to achieve that delightful creamy texture when processed. If you freeze it for less time, you may end up with a slushy consistency instead.
4. What should I do if my Ninja Creami mixture has ice crystals?
If you notice ice crystals in your frozen treat, it may be due to insufficient blending or freezing time. To prevent this, blend your ingredients until smooth and freeze them solidly. If ice crystals form, try processing the mixture again in the Ninja Creami to restore its creamy texture.
5. How can I store my Ninja Creami creations to keep them fresh?
To keep your Ninja Creami recipes fresh, store them in airtight containers in the freezer. This method helps maintain their creamy texture and prevents freezer burn. If your treats become too hard, simply let them sit at room temperature for a few minutes before serving.